JavaScript 核心觀念(52)- 繼承與原型鍊 - 原型鏈、建構函式整體結構概念

前言

接下來這一篇將會介紹整體原型鍊的觀念,因此可以說是類似回顧觀念並複習。

原型鏈、建構函式整體結構概念

在前面有講到相當多原型的觀念,也練習了如何建立自己的原型

1
2
3
4
5
6
7
8
9
10
11
12
13
14
15
16
17
18
19
20
21
22
23
24
25
function Animal(family) {
this.kingdom = '動物界';
this.family = family || '人科'; // 科別
}

Animal.prototype.breathe = function() {
console.log(this.name + ' 正在持續呼吸');
}

function Dog(name, color, size) {
Animal.call(this, '犬科')
this.name = name; // 狗的名字
this.color = color; // 狗的顏色
this.size = size; // 狗的體型
}

Dog.prototype = Object.create(Animal.prototype);
Dog.prototype.constructor = Dog;

Dog.prototype.back = function() {
console.log(this.name + ' 吠叫');
}

var bibi = new Dog('bibi', '棕色', '小');
console.log(bibi.constructor); // Dog 的建構函式

在此我們知道 bibi 繼承於 Dog 的原型,而狗又繼承於 Animal 的原型,透過這個原型鍊的概念,我們可以透過 Animal 延伸出相當多東西,例如:貓的原型、鳥的原型以及昆蟲的原型等等。
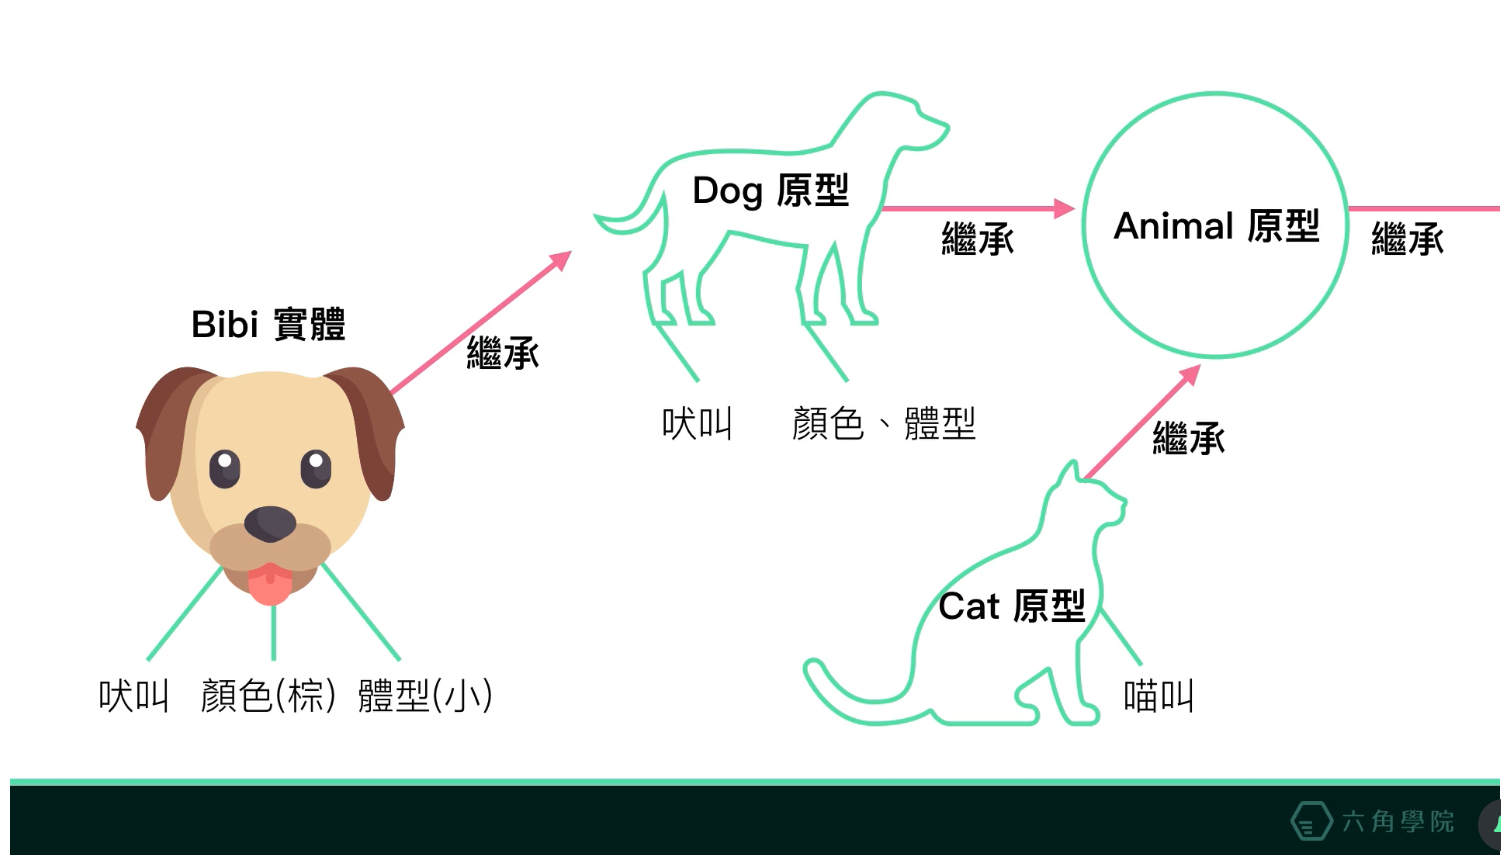
原型概念

前面我們了解到,原型都有向上查找的特性,而這個特性我們稱之為原型鍊

舉例來講 bibi (var bibi = new Dog('bibi', '棕色', '小');) 的原型再向上查找時,我們透過 __proto__ 查找會找到 Dog.prototype,而 Dog 的原型是怎麼建立的呢?主要是透過 Dog 的建構函式,而這一個建構函式也會指向 constructor 也就是下方這一段所建立

1
2
3
4
5
6
function Dog(name, color, size) {
Animal.call(this, '犬科')
this.name = name; // 狗的名字
this.color = color; // 狗的顏色
this.size = size; // 狗的體型
}

接下來 Dog 的原型還可以向上查找找到 Animal.prototype,並且與前面相同,Animal 的原型是基於 Animal 的建構函式所建立

1
2
3
4
function Animal(family) {
this.kingdom = '動物界';
this.family = family || '人科'; // 科別
}

接下來如果再依照 Animal.prototype 則會找到 Object.prototype,當然也會指向相對應的 Object 建構函式,因此這邊有一個重點「**每一個原型,都有屬於它自己的建構函式,也就是 constructor**」,但是這邊要注意到一件事情,當如果你在 Object 時,再繼續向上查找則只會找到 null 這個原始型別
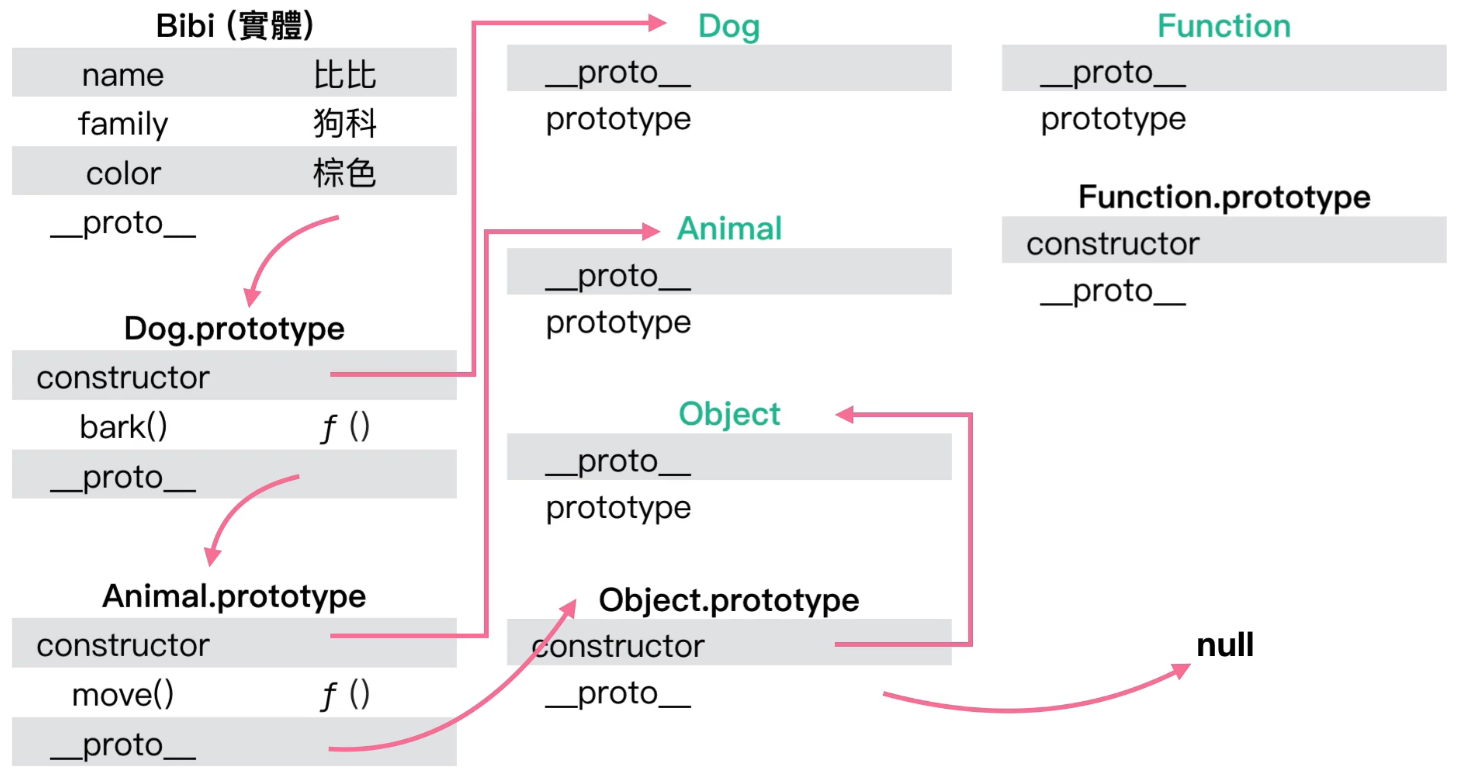
原型鍊

在上圖我們有看到 DogAnimal 以及 Object,而這邊建構函式我們都可以建立原型的方法

1
2
3
Dog.prototype.back = function() {
console.log(this.name + ' 吠叫');
}

那麼為什麼可以建立呢?原因在於 Dog.prototype 都是繼承於 Function 的原型
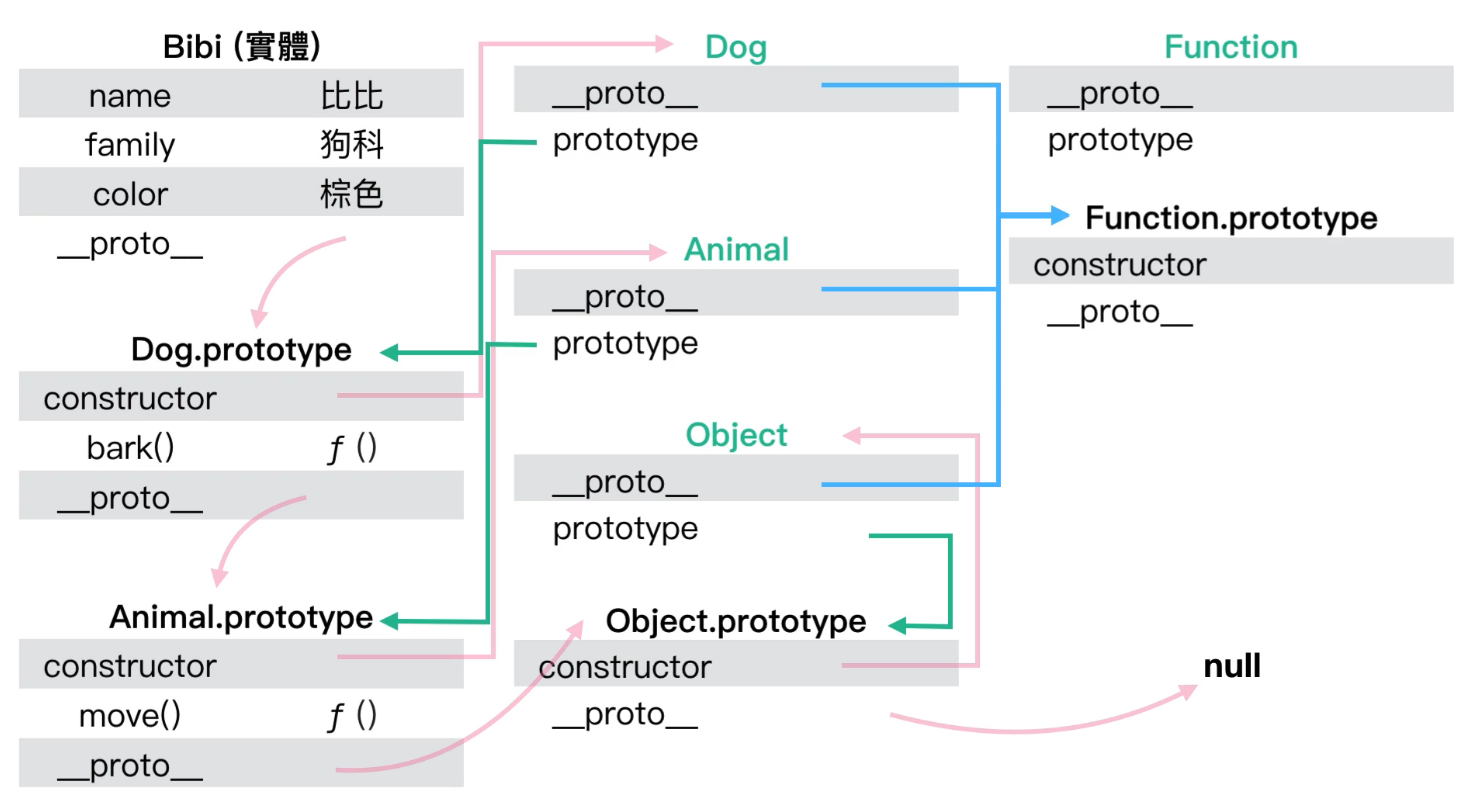
Function

想當然 Function 也有屬於它自己的建構函式,而如果在 Function 向上查找時,則會找到 Object 的原型
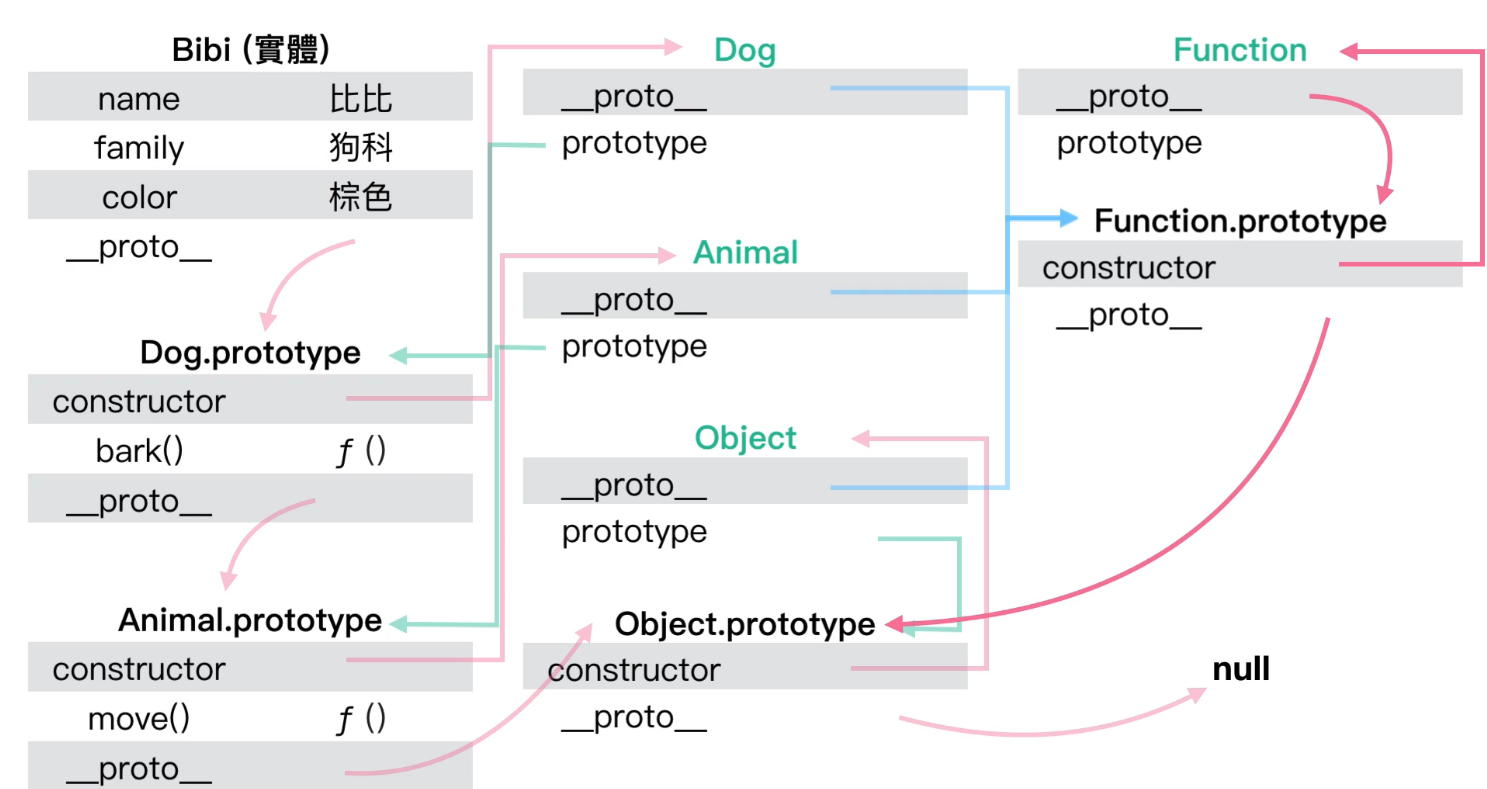
Function

上面講了很多,但實際上沒有驗證是很難理解,因此這邊將會使用以下程式碼來驗證

1
2
3
4
5
6
7
8
9
10
11
12
13
14
15
16
17
18
19
20
21
22
23
24
function Animal(family) {
this.kingdom = '動物界';
this.family = family || '人科'; // 科別
}

Animal.prototype.breathe = function() {
console.log(this.name + ' 正在持續呼吸');
}

function Dog(name, color, size) {
Animal.call(this, '犬科')
this.name = name; // 狗的名字
this.color = color; // 狗的顏色
this.size = size; // 狗的體型
}

Dog.prototype = Object.create(Animal.prototype);
Dog.prototype.constructor = Dog;

Dog.prototype.back = function() {
console.log(this.name + ' 吠叫');
}

var bibi = new Dog('bibi', '棕色', '小');

首先我們在一開始的 bibi (實體) 時有說到,當它向上查找會找到 Dog 的原型

1
bibi.__proto__ === Dog.prototype; // true

這邊要注意請不要輸入 bibi.__proto__ === Dog; 這樣除了結果會是 false 之外,最主要原因是,你是指向到這個函式,而不是狗的原型

那麼接下來我們還可以向上查找

1
bibi.__proto__.__proto__ === Animal.prototype; // true

而目前 bibi 已經向上爬了兩層,因此你可以將第一層 bibi.__proto__ 看成 Dog.prototype.__proto__ === Animal.prototype // true,而這邊我們也可以驗證繼承來的 constructor 是否就等於 Animal 的 constructor

1
bibi.__proto__.__proto__.constructor === Animal; // true

最後我們再來驗證如果再持續向上查找原型會找到 null 的原始型別這個觀念

1
2
3
4
// 第一層是 Dog -> bibi.__proto__ -> Dog.prototype
// 第二層是 Animal -> bibi.__proto__.__proto__ -> Animal.prototype
// 第三層是 Object -> bibi.__proto__.__proto__.__proto__ -> Object.prototype
bibi.__proto__.__proto__.__proto__.__proto__ === null; // true

而這邊函式的部分就不再次說明,直接提供程式碼看結果

1
2
3
Dog.__proto__ === Function.prototype; // true
Animal.__proto__ === Function.prototype; // true
Object.__proto__ === Function.prototype; // true

因此函式可以使用 prototype 都是來是 Function 的原型

最後的最後 Function 本身也是繼承於物件

1
Function.__proto__.__proto__ === Object.prototype; // true

參考文獻

Liker 讚賞

這篇文章如果對你有幫助,你可以花 30 秒登入 LikeCoin 並點擊下方拍手按鈕(最多五下)免費支持與牡蠣鼓勵我。
或者你可以也可以請我「喝一杯咖啡(Donate)」。

Buy Me A Coffee Buy Me A Coffee

Google AD

撰寫一篇文章其實真的很花時間,如果你願意「關閉 Adblock (廣告阻擋器)」來支持我的話,我會非常感謝你 ヽ(・∀・)ノ