是 Ray 不是 Array

整理這些技術筆記真的很花時間,如果你願意 關閉 Adblock 支持我,我會把這份感謝轉換成更多「踩坑轉避坑」的內容給你!ヽ(・∀・)ノ

Advertisement
2022-02-25 Nodejs

(12)被迫吃芒果的前端工程師 - Mongoose 之 Create 與 Model

前言

前面我們已經認識了 Schema 的建立方式與 SchemaType 跟 Schema Validators,但這只是單純的告知 Mongoose 我們資料的型別而已,本質上來講根本還沒拿來用,因此接下來將會來使用。

Model

這邊先看一下前面的練習 Schema

1
2
3
4
5
6
7
8
9
10
11
12
13
14
15
16
17
18
19
20
21
22
23
24
25
26
27
28
29
30
31
32
33
const UserSchema = new mongoose.Schema({
account: {
type: String,
required: true,
},
password: {
type: String,
required: true,
},
nickname: {
type: String,
minLength: 3,
maxLength: 20
},
age: {
type: Number,
min: 18,
max: 99,
},
job: {
type: String,
enum: [
'科技類',
'電子類',
'食品加工類',
'營造業',
]
},
createTime: {
type: Date,
default: Date.now,
}
});

當我們真的要使用這個 Schema 時,就要使用 model 語法來建立 Model,而 model 語法帶入兩個參數,第一個是 Model 名稱,第二個是 Model 要參考的 Schema

1
2
3
4
5
6
7
8
9
10
11
12
13
14
15
16
17
18
19
20
21
22
23
24
25
26
27
28
29
30
31
32
33
34
35
36
const UserSchema = new mongoose.Schema({
account: {
type: String,
required: true,
},
password: {
type: String,
required: true,
},
nickname: {
type: String,
required: [true, 'nickname is required.'],
minLength: 3,
maxLength: 20
},
age: {
type: Number,
min: 18,
max: 99,
},
job: {
type: String,
enum: [
'科技類',
'電子類',
'食品加工類',
'營造業',
]
},
createTime: {
type: Date,
default: Date.now,
}
});

const User = mongoose.model('User', userSchema);

而這邊比較需要注意的是第一個參數,第一個參數首字要大寫,然後是單數的形式,在使用 Model 時 Mongoose 會自己轉換成複數的,然後首字會自己變成小寫,因此通常會是單數且首字大寫。

這邊要記得補上匯出語法 module.exports = User;

儲存

匯出之後,可以到

app.js 檔案引入 mode/user.js

1
var User = require('./model/User');

然後就可以準備寫入的資料

1
2
3
4
5
6
7
var ray = new User({
account: 'ray',
password: 'test1234',
nickname: 'RayXu',
age: 25,
job: '科技類',
})

最後只需要使用 save() 語法就可以儲存了

1
2
3
4
5
6
7
8
9
var ray = new User({
account: 'ray',
password: 'test1234',
nickname: 'RayXu',
age: 25,
job: '科技類',
})

ray.save();

那麼 save 語法是一個 Promise 語法,因此可以使用 then or async & await 語法,這邊我使用 then 當作範例

1
2
3
4
5
6
7
8
9
10
11
12
13
14
15
var ray = new User({
account: 'ray',
password: 'test1234',
nickname: 'RayXu',
age: 25,
job: '科技類',
})

ray.save()
.then(() => {
console.log('Save');
})
.catch((e) => {
console.log(e)
})

接下來當你輸入 npm start 之後就會儲存進去到 MongoDB 中,因此你可以打開終端機輸入以下指令

1
2
3
> mongo
> use example
> db.users.find()

此時你就會看到剛剛儲存進去的資料了。

save

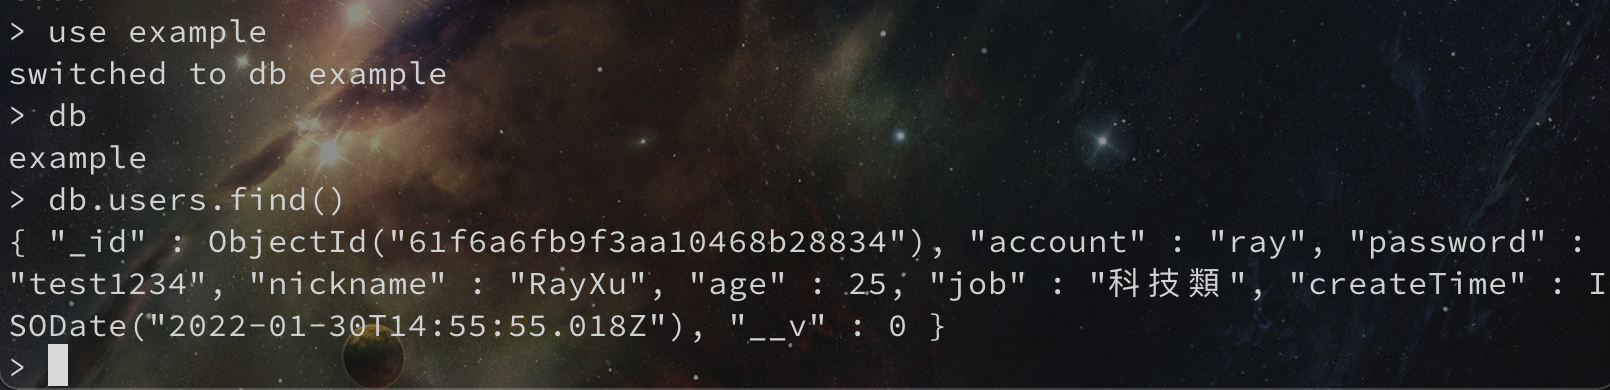
這就是最基本的 Mongoose 儲存方式了

整理這些技術筆記真的很花時間,如果你願意 關閉 Adblock 支持我,我會把這份感謝轉換成更多「踩坑轉避坑」的內容給你!ヽ(・∀・)ノ

Advertisement

你的支持會直接轉換成更多技術筆記

如果我的筆記讓你少踩一個坑、節省 Debug 的時間,
也許你可以請我喝杯咖啡,讓我繼續當個不是 Array 的 Ray ☕

Terminal

分享這篇文章

留言

© 2025 Ray. All rights reserved.

Powered by Ray Theme