前言
前一篇我們對於爬蟲應該有一些基本的概念與認知了,接下來當然就是要來實作一下囉。
爬蟲實作
首先一開始在實作之前,我們先回顧一下爬蟲的流程:
爬蟲不外乎就是透過這三個步驟來實作的,因此接下來我們會先講講「取得資料」的方式。
實作的時候,請你先輸入以下指令來建立第一個專案:
1
2
3
4
| mkdir example-crawler
cd example-crawler
npm init -y
touch index.js
|
其餘的一些部分我就不再重複說明了,例如什麼 package.json 之類的,所以接下來就直接準備開始實作吧。
分析來源
其實分析來源很簡單,簡單來講就是你要知道你要爬的網站是什麼,然後你要取得的資料是什麼,這樣就可以了,後面會直接進入實作,所以這邊讓我簡單帶過就好。
取得資料
取得資料的方式有很多種,我們可以透過 HTTP Request 來取得資料,什麼意思呢?簡單來講就是模擬我們打開瀏覽器,並且輸入網址,然後瀏覽器就會幫我們發送 HTTP Request,並且取得資料,這就是一種方式。
那我們該怎麼取得呢?你可以透過 axios 這個套件,因此如果你要使用 axios 的話,你可以先安裝:
但我這邊並不打算使用 axios,因為 Node.js 在大概 v18 左右,就已經內建了 fetch 這個方法,因此我們可以直接使用 fetch 來取得資料。
Note
Fetch API 原本是瀏覽器才有的方法,但是 Node.js 在 v18 內建支援 fetch 這個方法,因此我們可以直接使用 fetch 來取得資料。
那我們目標是誰呢?這邊就先以我的部落格當作範例吧?我的部落格網址是以下
1
| https://israynotarray.com/
|
接下來就是撰寫範例程式碼,我們先來看一下程式碼:
1
2
3
4
5
6
7
8
9
10
11
12
13
|
const getData = async (url) => {
try {
const response = await fetch(url);
const data = await response.text();
console.log(data);
return data;
} catch (error) {
console.log(error);
}
}
const html = getData('https://israynotarray.com/');
|
上面程式碼應該是沒有很困難,所以我就不花太多時間去逐行說明了,接下來你只需要輸入 node index.js 就可以看到結果囉

終端機基本上你會看到一大推的 HTML 標籤,這就是我們要的資料,所以第一步驟我們完成了。
Note
普遍前端所串接的 API 回傳的格式通常是 JSON 格式,但是爬蟲的資料格式通常是 HTML,因此我們在解析資料的時候,就必須要注意資料格式。
解析資料
接下來這個階段就很重要了,因為我們需要去解析取得的 HTML 資料,而這時候就會需要使用到 Cheerio 這個套件
Cheerio 是一款寫起來很像 jQuery 的套件,如果你有寫過 jQuery 的話,基本上你應該會覺得格外的親切,因為它的 API 跟 jQuery 的 API 很像,底下是一個簡單的範例:
1
2
3
4
5
6
7
8
| const cheerio = require('cheerio');
const $ = cheerio.load('<h2 class="title">Hello world</h2>');
$('h2.title').text('Hello there!');
$('h2').addClass('welcome');
$.html();
|
如果這邊沒有什麼太大的問題的話,就立刻讓我們回頭來處理剛剛取得的 HTML 資料吧!
首先我們要解析資料之前,要先知道我們要取得什麼資料,這邊我們就先以我的部落格為例,我們要取得的資料有:
(一開始先簡單一點)
不用擔心,這邊我會一個一個步驟說明的,所以就先來看引入 Cheerio 之後的程式碼吧!
1
2
3
4
5
6
7
8
9
10
11
12
13
14
|
const cheerio = require('cheerio');
const getData = async (url) => {
}
const crawler = async () => {
const html = await getData('https://israynotarray.com/');
const $ = cheerio.load(html);
}
crawler();
|
我們可以看到這邊當我們取得了 https://israynotarray.com/ 之後,我們將 HTML 資料傳入 cheerio.load() 這個方法,這樣就可以將 HTML 資料轉換成 Cheerio 物件,接著我們就可以透過 Cheerio 物件來取得我們想要的資料了。
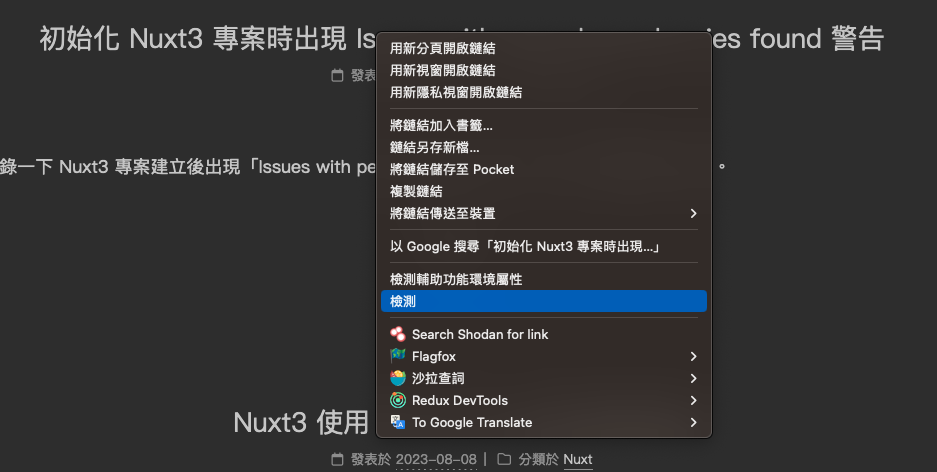
那我們該怎麼取得我們要的文章標題、文章網址呢?這時候就要依賴你對於 HTML 標籤的知識了,首先打開我的部落格,然後點標題右鍵選「檢查」

Note
由於我習慣使用 Firefox,因此畫面可能會有一點點不同,但不用太擔心,基本上都雷同。
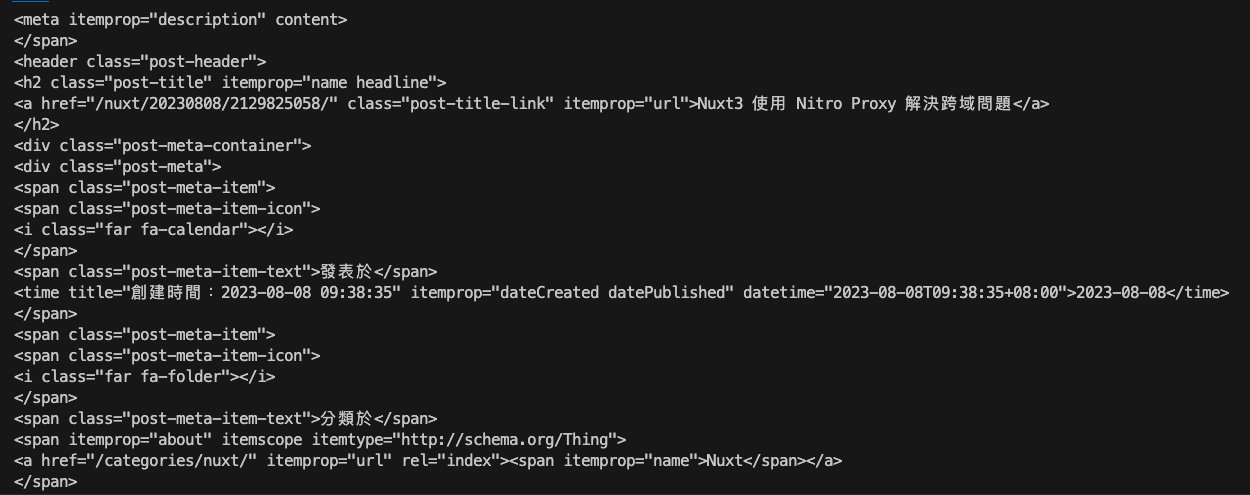
接著你應該會看到你的瀏覽器跳出開發者工具,並且自動選取了你剛剛點擊的標籤,這時候你就可以看到你剛剛點擊的標籤的 HTML 結構了

這邊我也貼上結構給予參考:
1
2
3
| <a href="/nuxt/20230808/3162324445/" class="post-title-link" itemprop="url">
初始化 Nuxt3 專案時出現 Issues with peer dependencies found 警告
</a>
|
而這邊我們就可以使用 class 去選取這個文字以及網址了,因此我們可以透過 $('.post-title-link') 來選取這個標籤
1
2
3
4
5
6
7
8
9
10
11
12
13
14
15
16
|
const cheerio = require('cheerio');
const getData = async (url) => {
}
const crawler = async () => {
const html = await getData('https://israynotarray.com/');
const $ = cheerio.load(html);
const postTitleLink = $('.post-title-link');
}
crawler();
|
然後呢?然後我們要透過 .text() 來取得文字,透過 .attr('href') 來取得網址,但是由於 postTitleLink 會是一推的標籤,因此我們必須要透過 .each() 來逐一取得並解析資料
1
2
3
4
5
6
7
8
9
10
11
12
13
14
15
16
17
18
19
20
21
22
|
const cheerio = require('cheerio');
const getData = async (url) => {
}
const crawler = async () => {
const html = await getData('https://israynotarray.com/');
const $ = cheerio.load(html);
const postTitleLink = $('.post-title-link');
postTitleLink.each((index, element) => {
const title = $(element).text();
const url = $(element).attr('href');
console.log(title, url);
});
}
crawler();
|
Note
cheerio 解析後會是一個 cheerio 物件結構,因此如果是多個資料時,會建議使用 each() 來逐一處理/取得內容,以確保資料正確性。
接下來其實你可以嘗試輸入 node index.js,你應該會看到以下畫面

恭喜你,你已經成功解析取得我們要的資料了。
儲存資料
接下來就很簡單了,你可以依照你的需求將資料儲存在本地或者是資料庫中,而這邊我就先簡單的儲存在本地吧!
1
2
3
4
5
6
7
8
9
10
11
12
13
14
15
16
17
18
19
20
21
22
23
24
25
26
27
28
29
30
31
32
33
34
35
36
|
const fs = require('fs');
const cheerio = require('cheerio');
const getData = async (url) => {
try {
const response = await fetch(url);
const data = await response.text();
return data;
} catch (error) {
console.log(error);
}
}
const crawler = async () => {
const html = await getData('https://israynotarray.com/');
const $ = cheerio.load(html);
const postTitleLink = $('.post-title-link');
const data = [];
postTitleLink.each((index, element) => {
const title = $(element).text();
const url = $(element).attr('href');
data.push({
title,
url,
});
});
fs.writeFileSync('./data.json', JSON.stringify(data));
}
crawler();
|
一點都不難吧?我們只需要將資料儲存在 data 這個陣列中,然後最後再將 data 這個陣列轉換成 JSON 格式,並且儲存在 data.json 這個檔案中就完成了~
你打開 data.json 應該可以看到以下
1
| [{"title":"初始化 Nuxt3 專案時出現 Issues with peer dependencies found 警告","url":"/nuxt/20230808/3162324445/"},{"title":"Nuxt3 使用 Nitro Proxy 解決跨域問題","url":"/nuxt/20230808/2129825058/"},{"title":"Node.js 應用篇 - 使用 Nodemailer 來發送 Email","url":"/nodejs/20230722/1626712457/"},{"title":"關於在 Vue 的 Single-File Components 上使用 HOF 分析","url":"/vue/20230711/2687889198/"},{"title":"關於我成為了 2023 Node.js 軟體工程師企業專題班教練這件事","url":"/learnexp/20230701/2021952545/"},{"title":"解決 「quill Overwriting modules/xxx with class...」問題","url":"/javascript/20230629/1402048802/"},{"title":"博弈公司的工程師生活:揭開神秘面紗,機會與挑戰並存","url":"/other/20230626/4076164354/"},{"title":"前端工程師的光與影:仔細思考後再踏進這個領域","url":"/other/20230617/2478456532/"},{"title":"語意比你想像的還更重要,那些你不重視的 HTML 標籤","url":"/html/20230613/61882704/"},{"title":"關於 Windows 上「找不到此項目」刪除不掉的資料夾/檔案","url":"/other/20230603/640262931/"}]
|
是不是超簡單呢?所以我認為你也可以試著去寫寫看這個爬蟲,因為這是一個很簡單的爬蟲,先讓你有一個練練手感覺,後面我們再來去實作一些比較複雜一點點的爬蟲吧!
Note
預設情況下 fs.writeFileSync('./data.json', JSON.stringify(data)); 會是壓縮過的 JSON 格式,如果你想要格式化的話,可以使用 fs.writeFileSync('./data.json', JSON.stringify(data, null, 2)); 這樣就可以了。
那麼這一邊就先到這邊結束囉,我們下一篇見哩。
整理這些技術筆記真的很花時間,如果你願意 關閉 Adblock 支持我,我會把這份感謝轉換成更多「踩坑轉避坑」的內容給你!ヽ(・∀・)ノ
Advertisement


