前言
常常聽到人家說 JSX 這是什麼東西?好像對於寫 React 的人來講是一個必須要學的東西?
JSX 介紹
撰寫 React 之前你一定會需要了解 JSX,而前面我們也都有一直寫到 JSX,只是沒有特別了解它而已,所以這邊就要來認識一下 JSX 是什麼。
 React JSX
如同剛剛前面所說的,我們已經有撰寫過 JSX,或許只是你沒發現而已,那…前面我們什麼時候寫過 JSX 呢?讓我們拉前面範例一下
1
2
3
4
| const app = document.querySelector('#app');
const root = ReactDOM.createRoot(app);
root.render(<h1>Hello React</h1>);
|
其實 root.render(<h1>Hello React</h1>); 裡面這一段 <h1>Hello React</h1> 就是 JSX。
JSX 它既不是 HTML 也不是一個字串,更不是 CSS (廢話),是 React 針對 JavaScript 所出的擴充語法,全名是 JavaScript & XML,是一個 HTML in JavaScript 的擴充語法(以下簡稱 JSX)。
那 JSX 基礎語法是如何呢?它就是如下方範例這樣撰寫
1
| const example = <h1>Hello React</h1>;
|
對於第一次看到 JSX 語法的人來講可能會覺得很 Magic!為什麼會覺得是一個魔術呢?畢竟我們在 JavaScript 中撰寫 HTML 是必須使用單或雙引號、反引號來包覆,可是 JSX 卻不用。
而當你試著輸出 const example = <h1>Hello React</h1>; 這一段變數時,你會發現 JSX 會自動轉換為一個 React Element
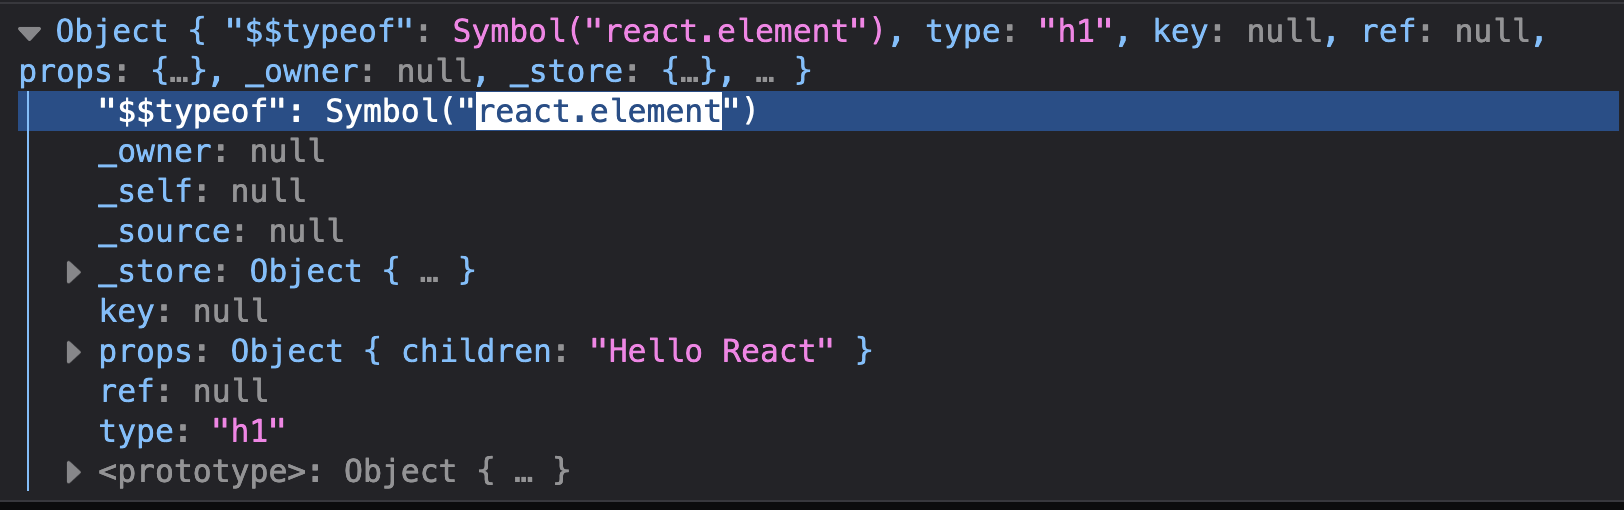 React Element
這代表著什麼意思呢?在第二篇「終究都要學 React 何不現在學呢? - React 基礎 - Hello React - (2)」中我們有提到 React.createElement 的寫法:
1
2
3
4
5
6
7
8
| const app = document.querySelector('#app');
const root = ReactDOM.createRoot(app);
const element = React.createElement('h1', {
children: 'Hello React',
})
root.render(element);
|
我相信你在實際開發時,你應該不會想要每次新增一個元素就寫一次 React.createElement
1
2
3
4
5
6
7
8
9
10
11
12
| const app = document.querySelector('#app');
const root = ReactDOM.createRoot(app);
const content = React.createElement('p', {
children: 'lorem lorem lorem lorem lorem lorem',
})
const element = React.createElement('h1', {
children: ['Hello React', content],
})
root.render(element);
|
相較之下直接使用 JSX 會更香更好學,彷彿就跟寫原生 HTML 沒有什麼兩樣
1
2
3
4
5
6
7
| const app = document.querySelector('#app');
const root = ReactDOM.createRoot(app);
const example = <h1>
Hello React
<p>lorem lorem lorem lorem lorem lorem</p>
</h1>;
root.render(example);
|
JSX 鍵 (Key)
接著讓我們拉一下前面其中一個範例,剛剛有少講到一個東西
1
2
3
4
5
6
7
8
9
10
11
12
| const app = document.querySelector('#app');
const root = ReactDOM.createRoot(app);
const content = React.createElement('p', {
children: 'lorem lorem lorem lorem lorem lorem',
})
const element = React.createElement('h1', {
children: ['Hello React', content],
})
root.render(element);
|
如果你是使用 React.createElement 的方式的話,基本上你會發現這個 Console 會噴一段訊息給你
“Warning: Each child in a list should have a unique ‘key’ prop. See https://reactjs.org/link/warning-keys for more information.%s” “
h1”
當然這個錯誤訊息並不局限於 React.createElement,如果你將 JSX 改寫成以下跑迴圈,其實也會發生該問題
1
2
3
4
5
6
7
8
9
10
11
| const app = document.querySelector('#app');
const root = ReactDOM.createRoot(app);
const arr = [''];
const P = () => (<p>lorem lorem lorem lorem lorem lorem</p>);
const example = <h1>
Hello React
{ arr.map(() => (<P />)) }
</h1>;
root.render(example);
|
解決方式非常簡單,只需要加上 key 就可以解決了,以 React.createElement 來講就是以下改法
1
2
3
4
5
6
7
8
9
10
11
12
13
| const app = document.querySelector('#app');
const root = ReactDOM.createRoot(app);
const content = React.createElement('p', {
children: 'lorem lorem lorem lorem lorem lorem',
key: 'content',
})
const element = React.createElement('h1', {
children: ['Hello React', content],
})
root.render(element);
|
而 JSX 寫法則是在元件上面補一個 key 屬性,並搭配 index 建立一個唯一值就可以了
1
2
3
4
5
6
7
8
9
10
11
| const app = document.querySelector('#app');
const root = ReactDOM.createRoot(app);
const arr = [''];
const P = () => (<p>lorem lorem lorem lorem lorem lorem</p>);
const example = <h1>
Hello React
{ arr.map((item, index) => (<P key={ `p${index}` }/>)) }
</h1>;
root.render(example);
|
那麼你可能會好奇了,為什麼會需要 key?key 有什麼用?key 其實主要是幫助 React 識別這個元件是否被調整或刪除等行為,來決定是否重新渲染,以範例來講我們可以看一下下方範例
1
2
3
4
5
6
7
8
9
10
11
12
13
14
15
16
17
18
19
20
21
22
23
24
25
26
27
28
29
30
31
32
33
34
35
36
| function App (){
const [ arrayData, setArrayData ] = React.useState([
{
id: '',
name: 'Ray',
price: 80,
},
{
name: 'John',
price: 90,
},
{
name: 'Mary',
price: 100,
}
]);
function sayHi () {
setArrayData([ ...arrayData.reverse() ])
}
return (
<div>
<ul>
{ arrayData.map((item) => (
<li>{ item.name } - <input type="text"/></li>
)) }
</ul>
<button type="button" onClick={ sayHi }>反轉</button>
</div>
)
}
const app = document.querySelector('#app');
const root = ReactDOM.createRoot(app);
root.render(<App />);
|
上方是一個簡單範例,你可以先針對 input 欄位輸入 1、2、3,接著按下「反轉」按鈕,你會發現欄位還是會保持原本,但是資料已經反轉了,而這其實就會導致一些問題發生。
接著你試著補上 key 再輸入一次 1、2、3,接著按下「反轉」按鈕,這時候你應該會發現欄位的 1 跟 3 會消失,因為 React 檢測到這兩個資料有變化,因此決定重新渲染
1
2
3
4
5
6
7
8
9
10
11
12
13
14
15
16
17
18
19
20
21
22
23
24
25
26
27
28
29
30
31
32
| function App (){
const [ arrayData, setArrayData ] = React.useState([
{
id: '',
name: 'Ray',
price: 80,
},
{
name: 'John',
price: 90,
},
{
name: 'Mary',
price: 100,
}
]);
function reverseData () {
setArrayData([ ...arrayData.reverse() ])
}
return (
<div>
<ul>
{ arrayData.map((item, index) => (
<li key={ `${item.name}${index} `}>{ item.name } - <input type="text"/></li>
)) }
</ul>
<button type="button" onClick={ reverseData }>反轉</button>
</div>
)
}
|
這就是為什麼 React 會建議你補上 key 的原因,最後請記住一件事情,如果可以的話,請使用陣列資料中的唯一值當作 key 下下策才使用索引,否則很有可能發生一些奇怪的事情。
JSX 表達式 (Expression)
接著我們繼續聊 JSX 的部分,JSX 其實也可以嵌入一個表達式 (Expression)
如果不知道什麼是表達式,可閱讀我之前文章:JavaScript 核心觀念(11)-運算子、型別與文法-陳述式與表達式
使用方式非常簡單只需要在 JSX 中使用大括號、花括號(以下統一稱花括號)並填寫變數即可,只要它是一個表達式,那麼就可以正常運作
1
2
3
4
5
6
7
| const app = document.querySelector('#app');
const root = ReactDOM.createRoot(app);
const myName = 'Ray';
const example = <h1> Hello { myName } </h1>;
root.render(example);
|
由於可以支援表達式的關係,因此我們也可以寫一些函式來回傳結果
1
2
3
4
5
6
7
8
9
10
| const sayHi = (status) => {
if(status) {
return 'Ray';
}
return 'Tom';
}
const example = <h1> Hello { sayHi(false) } </h1>;
root.render(example);
|
甚至寫一些奇怪的 Code,只要你是表達式通通都可以
1
2
3
4
5
6
| const app = document.querySelector('#app');
const root = ReactDOM.createRoot(app);
const example = <h1> Hello { console.log('Hello') } </h1>;
root.render(example);
|
(附註:console.log 本身也是屬於表達式一種,只是預設不會回傳任何東西。)
那麼因為 JSX 只接受表達式的關係,所以是無法在 JSX 中撰寫 if...else 判斷式的
1
2
3
4
5
6
| const app = document.querySelector('#app');
const root = ReactDOM.createRoot(app);
const example = <h1> Hello { if(true) { console.log('Ray') } } </h1>;
root.render(example);
|
但是我們是可以在 JSX 中撰寫三元運算子的
1
2
3
4
5
6
| const app = document.querySelector('#app');
const root = ReactDOM.createRoot(app);
const example = <h1> Hello { true ? 'Ray' : 'Tom' } </h1>;
root.render(example);
|
那麼 JSX 這個特性與我們在撰寫 Vue SFC(單一元件檔, Single File Component)的 template 區塊也是一樣相同的。
JSX 陣列展開 (Spread)
另外 JSX 也有一些特別的功能,也就是可以自動展開陣列內容
1
2
3
4
5
6
7
8
9
10
11
| const app = document.querySelector('#app');
const root = ReactDOM.createRoot(app);
const list = [
<p key="e1">example 1</p>,
<p key="e2">example 2</p>,
]
const example = <h1> Hello { list } </h1>;
root.render(example);
|
JSX 中也是可以撰寫註解的,只是你要注意註解必須寫在花括號中,並且註解不要寫在同一行,如下
1
| const example = <h1> Hello { // 這是一段註解 } </h1>;
|
上方這種寫法將會導致後方都被註解而出現錯誤,正確應如下方寫法
1
| const example = <h1> Hello { /* 這是一段註解 */ }</h1>;
|
因此 JSX 中支援的註解是有星號的註解唷。
JSX 樣式(Style 與 Class)
實際開發時我們必定會替畫面給予一些樣式,如 HTML Style 跟 HTML Class,但這兩者在 JSX 中都有一些細節要注意,舉例來講 HTML Style 就要注意 JSX 採用的是 camelCase 撰寫方式(意旨遇到 - 減字號就轉大寫)
1
2
3
4
| const app = document.querySelector('#app');
const root = ReactDOM.createRoot(app);
const example = <h1 style={ {backgroundColor: 'black', color: 'white'} }>Hello React</h1>;
root.render(example);
|
這邊要注意 style 必定會是傳入一個花括號,裡面再傳入一個物件,為了方便辨別,所以上方寫法我改成以下會比較好觀看
1
2
3
4
5
6
7
8
9
10
| const app = document.querySelector('#app');
const root = ReactDOM.createRoot(app);
const customStyle = {
backgroundColor: 'black',
color: 'white'
};
const example = <h1 style={ customStyle }>Hello React</h1>;
root.render(example);
|
只是這邊要特別注意如果你傳入的是調整字型大小或是 margin 這類 CSS 語法並且剛剛好是單純的數字的話 JSX 預設單位會是 px
1
2
3
4
5
6
7
8
9
10
11
12
| const app = document.querySelector('#app');
const root = ReactDOM.createRoot(app);
const customStyle = {
backgroundColor: 'black',
color: 'white',
marginTop: 20,
fontSize: 72,
};
const example = <h1 style={ customStyle }>Hello React</h1>;
root.render(example);
|
這一段整體來講也與 Vue 部分神似(以下出自 Vue 官方文件並微調)
1
2
3
| <div id="app">
<h1 :style="styleObject">Hello Vue</h1>
</div>
|
1
2
3
4
5
6
7
8
9
10
11
12
| const { createApp } = Vue;
createApp({
data() {
return {
styleObject: {
backgroundColor: 'black',
color: 'white'
}
}
},
}).mount('#app')
|
那麼由於 JSX 本身是 JavaScript 擴充語法,因此裡面有一些地方就不會是原本的 HTML 寫法,如 class 變成 className
1
2
3
4
5
| const app = document.querySelector('#app');
const root = ReactDOM.createRoot(app);
const example = <h1 className="box">Hello React</h1>;
root.render(example);
|
那為什麼 class 會變成 className 呢?主要原因是因為 class 是 JavaScript 保留字,因此才會調整成 className。
後記
本文將會同步更新到我的部落格
 |
|
 |
|