前言
接下來要來聊聊關於元件的部分,如果你是一名 Vue 開發者,相信你對於元件這個概念一定非常的熟悉,那麼 React 呢?React 的元件又如何呢?
什麼是元件?
在 Vue 裡面我們都知道萬物皆元件(.vue),我們可以將任何一個區塊拆成小小的元件作為獨立維護,例如:
最常被拆成元件的 Header.vue 、Navbar.vue 與 Footer.vue。
也因為元件化的概念,我們可以將重複性較高的區塊挪出來獨立維護、撰寫樣式,並可以重複使用,減少程式碼彼此之間的耦合問題。
而這一點概念在 Vue.js 官方網站也有舉例一張圖當作範本
 元件
元件
因此其實元件你也可以把它想像成就是模組化的概念。
至於元件拆怎麼拆就不在這一次討論範圍內了,所以下面就直接進入 React 的部分。
React 元件
那麼不論 VAR(Vue、Angular、React) 哪一個框架都有元件概念存在,所以這邊就接著來認識一下 Racet 的元件部分。
在前面章節我們其實已經嘗試寫了無數次的 Function Component,也就是下面這一個範例程式碼
1
2
3
4
5
6
7
8
9
10
11
12
| const App = () => {
const sayHi = (e) => {
e.preventDefault()
window.alert('Hello!');
}
return (
<div>
<a href="https://israynotarray.com/" onClick={ sayHi }>點我</a>
</div>
)
}
|
不論你是寫上方的 Function Component 還是下方這種 Class Component
1
2
3
4
5
6
7
8
9
10
11
12
13
14
| class App extends React.Component {
sayHi(e) {
e.preventDefault()
window.alert('Hello!');
}
render() {
return (
<div>
<a href="https://israynotarray.com/" onClick={ this.sayHi }>點我</a>
</div>
);
}
}
|
這兩種寫法的 App 就是一個 Component,只是或許你沒發現而已。
雖然 Class 並不是這次要介紹的寫法,但是兩者寫法都是屬於 Component 的一種表現。
只是這邊要注意一件事情,當你在建立一個元件時,請注意命名首字必須為大寫,否則 JSX 很容易誤以為你是在寫一個 HTML DOM,舉例來講你建立了一個 Component 叫做 footer,那麼這就有可能讓 JSX 誤判以為你是在寫 HTML5 的 footer 標籤。
React 巢狀元件
我們在撰寫 Vue 的時候時常會在元件內又注入其他元件,而這就稱之為巢狀元件、巢狀結構,以範例來講的話類似這樣
1
2
3
4
5
6
7
8
9
10
11
12
13
14
15
16
17
18
19
20
21
22
23
24
25
26
27
28
29
30
31
32
33
34
35
36
37
38
39
40
41
42
43
44
45
46
47
48
49
50
51
52
53
54
55
56
57
58
59
60
| const { createApp, ref } = Vue;
const app = createApp({
setup() {
const text = ref('Hello Ray.');
return {
text,
}
}
});
app.component('my-component-1', {
template: `
<div class="orange">
<p>{{ text }}</p>
<my-component-2></my-component-2>
</div>
`,
setup() {
const text = ref('Hello Vue Components - 1.');
return {
text,
}
}
})
app.component('my-component-2', {
template: `
<div class="blue">
<p>{{ text }}</p>
<my-component-3></my-component-3>
</div>
`,
setup() {
const text = ref('Hello Vue Components - 2.');
return {
text,
}
}
})
app.component('my-component-3', {
template: `
<div class="green">
<p>{{ text }}</p>
</div>
`,
setup() {
const text = ref('Hello Vue Components - 3.');
return {
text,
}
}
})
app.mount('#app');
|
上面的程式碼如果不好理解的話,我這邊也有畫一張圖表示上方結構呈現的樣子
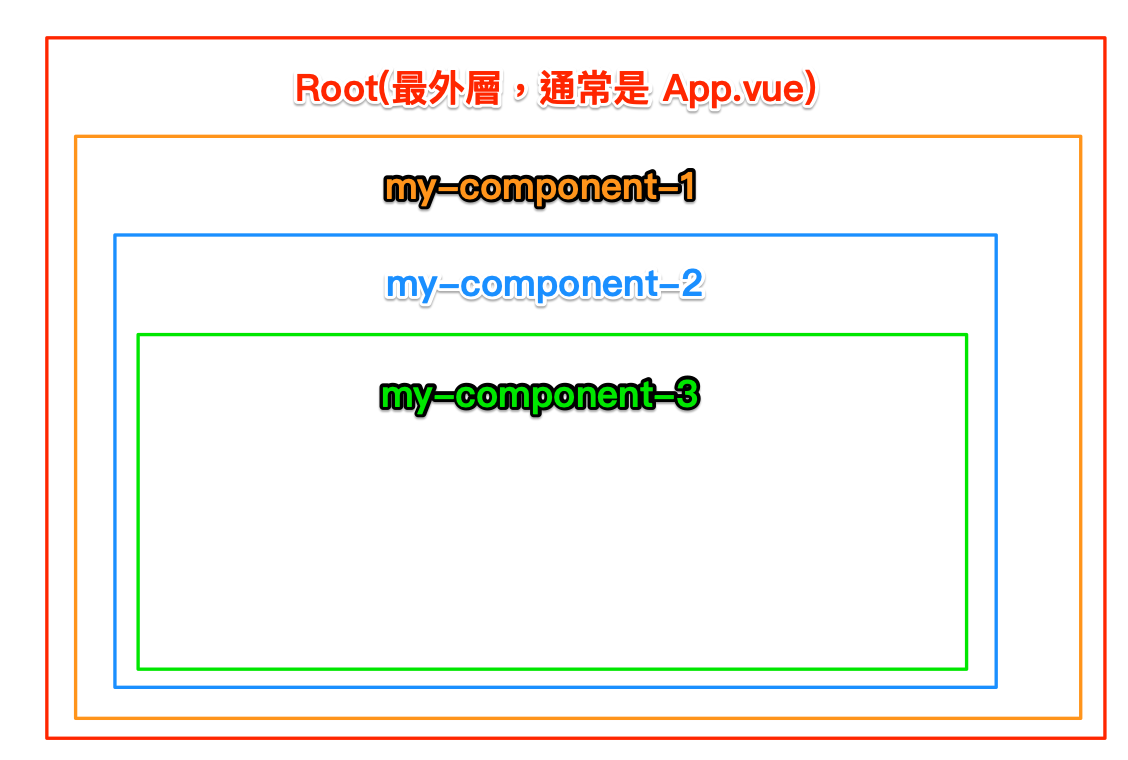 Vue Component
因此我們可以看到內容是 Root 裡面包著 my-component-1 接著 my-component-2 包 my-component-3 以此類推巢狀往裡面包,而這也就是巢狀結構的概念。
那 React 呢?React 如果要做到一樣類似的巢狀結構也是一樣嗎?答案是一樣的,讓我們看一下範例
1
2
3
4
5
6
7
8
9
10
11
12
13
14
15
16
17
18
19
20
21
22
23
24
25
26
27
28
| const MyComponent3 = () => <div className="green"><p>Component - 3</p></div>
const MyComponent2 = () => (
<div className="blue">
<p>Component - 2</p>
<MyComponent3/>
</div>
)
const MyComponent1 = () => (
<div className="orange">
<p>Component - 1</p>
<MyComponent2/>
</div>
)
const App = () => {
return (
<div className="red">
<p>Hello Ray.</p>
<MyComponent1 />
</div>
)
}
const app = document.querySelector('#app');
const root = ReactDOM.createRoot(app);
root.render(<App />);
|
結論來講是的,稍微寫法有一點不一樣,但一樣是可以做到巢狀結構的。
React Props
Props 是元件在做資料傳遞中的核心精髓技巧,當我們將重複的地方獨立抽離成一個元件時,就會使用 Props 的技巧去將資料傳遞給該元件,這邊舉例 Vue 的 props 範例,我們通常會搭配 v-bind(縮寫為 :) 來動態傳遞資料
1
2
3
4
5
6
7
8
9
10
11
12
13
14
15
16
17
18
19
20
21
22
23
24
25
26
27
28
29
30
31
32
33
| const { createApp, ref } = Vue;
const app = createApp({
setup() {
const data = ref({
name: 'Ray',
url: 'https://israynotarray.com/'
});
return {
data,
}
}
});
app.component('my-component-1', {
template: `
<div class="orange">
<p>我的名字是:{{ data.name }}</p>
<p>我的部落格網址是:{{ data.url }}</p>
</div>
`,
props: ['data'],
setup({ data }) {
const text = ref('Components - 1.');
return {
data,
}
}
})
app.mount('#app');
|
那 React 呢?其實 React 也是一樣,只是不用像 Vue 一樣前面加一個 : 就可以傳遞了
1
2
3
4
5
6
7
8
9
10
11
12
13
14
15
16
17
18
19
20
21
22
23
24
25
| const MyComponent1 = (props) => {
return (
<div className="orange">
<p>我的名字是:{ props.data.name }</p>
<p>我的部落格網址是:{ props.data.url }</p>
</div>
)
}
const App = () => {
const data = {
name: 'Ray',
url: 'https://israynotarray.com/'
}
return (
<div className="red">
{ JSON.stringify(data) }
<MyComponent1 data={ data } />
</div>
)
}
const app = document.querySelector('#app');
const root = ReactDOM.createRoot(app);
root.render(<App />);
|
(因 JSX 無法直接輸出物件到畫面上,因使必須使用 JSON.stringify 額外處理)
在 React 中能夠傳遞的不只是單純的字串,包含物件、陣列與數字,甚至是 DOM 都可以
1
2
3
4
5
6
7
8
9
10
11
12
13
14
15
16
17
18
19
20
21
22
23
24
25
26
27
28
29
30
31
32
| const MyComponent1 = (props) => {
console.log('props:', props);
return (
<div>
<p>name: { props.name }, type: { typeof props.name }</p>
<p>data: { props.data.myName }, type: { typeof props.data }</p>
<p>arr: { props.arr[0] }, type: { typeof props.arr }</p>
<p>numStr: { props.numStr }, type: { typeof props.numStr }</p>
<p>num: { props.num }, type: { typeof props.num }</p>
<p>dom:{ props.dom }, type: { typeof props.dom }</p>
</div>
)
}
const App = () => {
return (
<div>
<MyComponent1
name="Ray"
data={ { myName: 'Ray' } }
arr={ [1, 2, 3] }
numStr="1"
num={ 1 }
dom={ <h1>這是一段文字</h1> }
/>
</div>
)
}
const app = document.querySelector('#app');
const root = ReactDOM.createRoot(app);
root.render(<App />);
|
上方範例中我們可以看到一個地方很有趣,如果你傳入的是一個 HTML DOM 的話,到達元件時則會直接渲染到畫面上,這是一個滿有趣的地方。
最後這邊有一件事情非常重要,在 React 中 Props 是屬於單向數據流的,這是什麼意思呢?簡單來講就是 Props 是 OnlyRead (唯讀) 的,這一點與 Vue 是相同的,主要是避免資料流向的混亂,因此通常 Props 是禁止修改的。
React Slot
還記得嗎?我們在撰寫 Vue 元件時,有時候會使用 Slot (插槽)的功能來達到傳遞資料的需求,類似像這樣
1
| <my-component>這是一段話<my-component>
|
而接下來 <my-component /> 元件內就會有個地方是 <slot></slot>,而這一段 <slot></slot> 就會被替換成「這是一段話」的字。
那麼你可能會想說有了 Props 為什麼還要用 Slot?你可以試想一個問題,一個網站上時常會使用到相當多的提示視窗,但內容、行為與樣式可能都會有所不同,雖然可以將每個提示視窗製作成一個元件並搭配 Props 傳遞資料渲染畫面,可是這樣子就會變成每一個提示視窗都要包裝成一個元件又或者我們無法確定到時候會傳入什麼內容、樣式跟行為,這時候就會使用 Slot 的技巧來達到。
這邊舉例 Bootstrap 的 Modal
1
2
3
4
5
6
7
8
9
10
11
12
13
14
15
16
17
| <div class="modal" tabindex="-1">
<div class="modal-dialog">
<div class="modal-content">
<div class="modal-header">
<h5 class="modal-title">Modal title</h5>
<button type="button" class="btn-close" data-bs-dismiss="modal" aria-label="Close"></button>
</div>
<div class="modal-body">
<p>Modal body text goes here.</p>
</div>
<div class="modal-footer">
<button type="button" class="btn btn-secondary" data-bs-dismiss="modal">Close</button>
<button type="button" class="btn btn-primary">Save changes</button>
</div>
</div>
</div>
</div>
|
See the Pen
(59) React - Components Props type by Ray (@hsiangfeng)
on CodePen.
先不說 modal-header 跟 modal-body 的內容如何,光是 modal-footer 的區塊就很常不同,一下子是新增 + 重設的按鈕,不然就是編輯 + 取消的按鈕等等狀況,所以如果在一開始我們再注入元件之前,就可以決定這區塊預計會顯示什麼,而不是透過 Props 去切換判斷的話 Slot 其實是非常好用的。
但 React 並不像 Vue 一樣有 Slot 的標籤,可是我們可以利用 props 參數中的 children 來達到類似的功能
1
2
3
4
5
6
7
8
9
10
11
12
13
14
15
16
17
18
19
20
21
22
23
24
25
26
27
28
29
30
31
32
33
34
35
36
37
| const MyComponent1 = (props) => {
return (
<div>
<div className="modal" style={{ display: 'block' }} tabIndex="-1">
<div className="modal-dialog">
<div className="modal-content">
<div className="modal-header">
<h5 className="modal-title">Modal title</h5>
<button type="button" className="btn-close" data-bs-dismiss="modal" aria-label="Close"></button>
</div>
<div className="modal-body">
<p>Modal body text goes here.</p>
</div>
<div className="modal-footer">
{ props.children }
</div>
</div>
</div>
</div>
</div>
)
}
const App = () => {
return (
<div>
<MyComponent1>
<button type="button" className="btn btn-secondary" data-bs-dismiss="modal">關閉</button>
<button type="button" className="btn btn-primary">儲存</button>
</MyComponent1>
</div>
)
}
const app = document.querySelector('#app');
const root = ReactDOM.createRoot(app);
root.render(<App />);
|
如果需要指定位置注入的話,則可以這樣做
1
2
3
4
5
6
7
8
9
10
11
12
13
14
15
16
17
18
19
20
21
22
23
24
25
26
27
28
29
30
31
32
33
34
35
36
37
38
39
40
41
42
43
44
45
46
47
48
49
50
51
52
| console.clear();
const MyComponent1 = (props) => {
return (
<div>
<div className="modal" style={{ display: 'block' }} tabIndex="-1">
<div className="modal-dialog">
<div className="modal-content">
{ props.modalHeader }
{ props.modalBody }
{ props.modalFooter }
</div>
</div>
</div>
</div>
)
}
const ModalHeader = () => (
<div className="modal-header">
<h5 className="modal-title">Modal title</h5>
<button type="button" className="btn-close" data-bs-dismiss="modal" aria-label="Close"></button>
</div>
)
const ModalBody = () => (
<div className="modal-body">
<p>Modal body text goes here.</p>
</div>
)
const ModalFooter = () => (
<div className="modal-footer">
<button type="button" className="btn btn-secondary" data-bs-dismiss="modal">關閉</button>
<button type="button" className="btn btn-primary">儲存</button>
</div>
)
const App = () => {
return (
<div>
<MyComponent1
modalHeader={ <ModalHeader/> }
modalBody={ <ModalBody/> }
modalFooter={ <ModalFooter/> }
/>
</div>
)
}
const app = document.querySelector('#app');
const root = ReactDOM.createRoot(app);
root.render(<App />);
|
透過以上方式,其實我們依然可以做到類似 Vue 的 Slot 效果。
後記
本文將會同步更新到我的部落格
 |
|
 |
|